This past Easter I wanted to go all out and make DIY Easter Treats for the dogs. In my husband?s family, between his mom, aunt, and two of his brothers, as well as us, there are seven dogs. We are also all the type of people that bring our dogs along on vacations and family dinners. These results in some seriously interesting family get togethers, full with all things dogs. Matt?s (my husband) eldest brother actually recently had the first grandchild in his family, so we know as we all start to have babies this will change. But for the time being, our focus is on our dogs and them getting the most out of their lives!
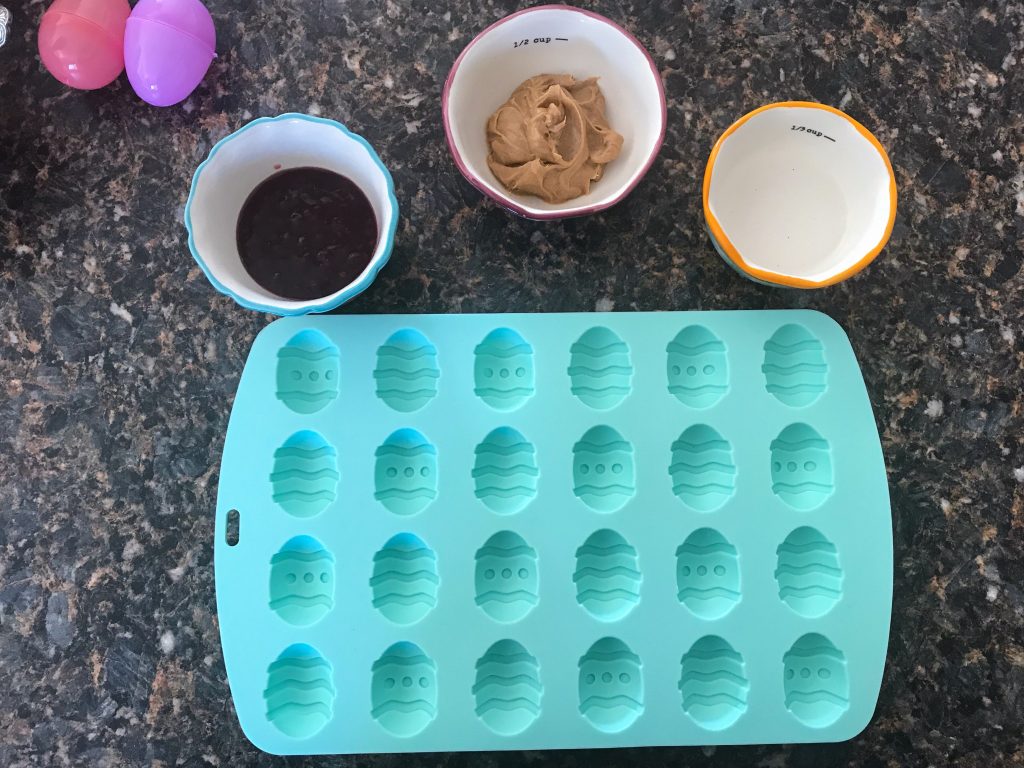
In saying that, I decided to make three different types of freezer treats and put them in little mason jars for our furry family members. All of these are super easy to make and just require chocolate or ice cube moulds. I purchased my Easter chocolate moulds from my local Michael?s Craft Store. They often have different kinds depending on the season and usually they go on sale closer to the holiday. I purchased mind for buy one get one 50% off. If you don?t have a local craft store that carries these, you can also purchase them from Bulk Barn or online from Amazon. I recommend purchasing the silicone moulds so that it is easy to pop to treats out once they are frozen.
The three different types of treats that I did were, coconut oil and blueberries, peanut butter and raspberry jam, as well as frozen strawberries and blueberries. All of the ingredients in the treats I had on hand at home and were very simple to make. Of course you can tailor the ingredients to your dogs likes. As I have mentioned in the past, I have a very picky dog so I am always trying new combinations and flavour to see what she likes and is worth making again.
So lets get into the DIYing!
Frozen Blueberry Coconut Oil Dog Treats

Ingredients
- Coconut Oil
- Blueberries (I used frozen)

Method
- Take your clean dry mould and place on a metal cookie sheet/tray.
- Put 2-3 blueberries in each cavity of the mould. Since I used a cute bunny bum mould, I put the blueberries where the tail and the paws are.
- Heat up your coconut oil in the microwave for about 30 seconds, or until it is a liquid.
- Pour or spoon the coconut oil over the blueberries in the cavities, until almost full to the top.
- Repeat with all of the cavities.
- Take your cookie sheet/tray with the mould on top and pop it into the freezer for about 30 minutes to an hour. This recipe will take the least amount of time to solidify since coconut oil is solid at room temperature.
- Once the coconut oil has solidified all the way through take them out of the freezer.
- Then take the mold and pop out the treats.
- Store in a jar or container in the freezer. You can store these ones in the fridge as well, however if you have used frozen blueberries as I have, they made release some liquid.

So there you have the first DIY Easter Treats. These coconut oil and blueberry treats are a huge hit with Marlee and she is a picky eater.
These treats are also really healthy for dogs. Coconut oil is good for your dogs stinky breathe due to its antibacterial properties. It is also good for digestion and reduces allergic reactions. One of the benefits that I love is that it?s great for your dog?s coat. It aids in itchy dry skin and works from the inside out. If you?re new to giving your dog coconut oil, it is recommend that you give your dog 1 teaspoon for every 10 pounds or 1 tablespoon for every 30 pounds. Start your dog off will a lower dosage to not throw off their system. If you plan on doing this recipe, I would work your dog up to being able to consume this much at once, or use a smaller mould with less coconut oil.

Blueberries are great for your dog just like they are great for humans. They contain vitamins, minerals, antioxidants as well as fiber. Blueberries are said to help improve vision, protect the brain against stress, as well as protect against cancer in dogs. For more check out the article, Health Benefits of Blueberries.
The second DIY Easter Treat that I made was Peanut Butter and Raspberry Jam. Who doesn?t love the classic of peanut butter and jam? I know I do so I figure that my four legged family members would as well. In the past I have mentioned that Marlee isn?t a huge fan of peanut butter. However, this is because she gets frustrated and doesn?t want to make the effort to eat it. These treats are a great solution to that problem since they are frozen. Your dog can take bites of the treats, eat it whole if they are a big enough dog, or lick it to savour the flavour.
Let?s get started to this twist on the classic PB and J
Peanut Butter and Raspberry Jam Dog Treats

Ingredients
- Peanut Butter
- Raspberry Jam
- Coconut Oil
Method
- Place clean dry mould onto a metal cookie sheet/tray.
- Warm up a small amount of coconut oil in the microwave for 30 seconds or until in a liquid form.
- Warm up your raspberry jam in the microwave to loosen it up. Don?t over heat and make hot.
- Mix together a very small amount of the coconut oil into the loose raspberry jam. This will help keep the form of the treat when out of the freezer, since coconut oil is solid at room temperature.
- Spoon raspberry jam and coconut oil mixture into mould cavity until halfway full.
- Repeat with all of the cavities.
- Place the tray in the freezer for 30-60 minutes until the raspberry jam has firmed up and is stiff enough that the jam and peanut butter won?t combine.
- Warm up the peanut butter in the microwave to loosen it up until it is a little bit liquid-like consistency.
- Take some of the liquid coconut oil and mix it with the warmed up peanut butter. Again, this helps to keep the peanut butter more solid while out of the freezer and helps to allow you to store them in the fridge.
- Take your peanut butter ad coconut oil mixture and spoon it into the cavities the rest of the way to the top.
- Repeat for all of the cavities.
- Place cookie sheet/tray with the mould in the freezer and freeze for 3 hours or over night until treats are frozen all the way through.
- Then take the mould and pop out the treats.
- Store in a jar or container in the freezer.

There you have it, the peanut butter and jam classic turned into your furry companions new favourite treat. This recipe is so simple and also has some health benefits for your doggie.
Many people know that peanut butter is a good source of protein. This is no different for dogs. Apart from peanut butter being as good source of protein it also contains heart healthy fats, vitamin B, Niacin and vitamin E. However, it is always advised to give your dog a small amount as a treat and not over indulge them, even though it may be their favourite.
Raspberries also have some great health benefits for your furry best friend. They are antioxidants similar to blueberries, as well as an anti-inflammatory. This is great if your four-legged friend has arthritis. Raspberries also contain vitamin C, manganese and fiber. However, it is important to note that raspberries also contain a small amount of xylitol, which is dangerous for dogs. Due to this reason, make sure that you limit the amount of raspberries your dog consumes and do not give raspberries to them regularly. In this recipe I used raspberry jam, but you could also take frozen or fresh raspberries and blend them up in a blender or food processor. However, make sure you only give them this treat in small amounts and not regularly.
The last DIY Easter Treat that I made was strawberry-blueberry. When coming up with these recipes I wanted to use ingredients that most people already have in their fridge and freezer. Maybe it?s just me, but I always have a ton of frozen fruit on hand. It?s often cheaper than buying fresh fruit, lasts longer, and is so versatile. Apart from feeding it to the dog, I love whipping it up in smoothies, topping my cereal and yogurt with it or just eating it straight. But it does come in handy with Marlee as well. That is why I have used strawberries and blueberries in this last DIY Easter Treat. It?s healthy for dogs and they love these two fruits.
Frozen Strawberry-Blueberry Layered Dog Treats

Ingredients
- Frozen Strawberries
- Frozen Blueberries
- Coconut oil

Method
- Place your clean dry mould on a metal cookie sheet/tray.
- Take your frozen strawberries and put them in a food processor or blender.
- Blend until the strawberries are broken up in small enough pieces that it turns into a paste when mushed together.
- Repeat the process above with your blueberries, making sure that they are small enough pieces that they combine into a paste.
- Next melt a small amount (about 4 tablespoons) of coconut oil in the microwave.
- Mix half of the coconut oil with the strawberries
- Mix half of the coconut oil with the blueberries; you need to do this quickly so that the coconut oil doesn?t harden when you are combining it.
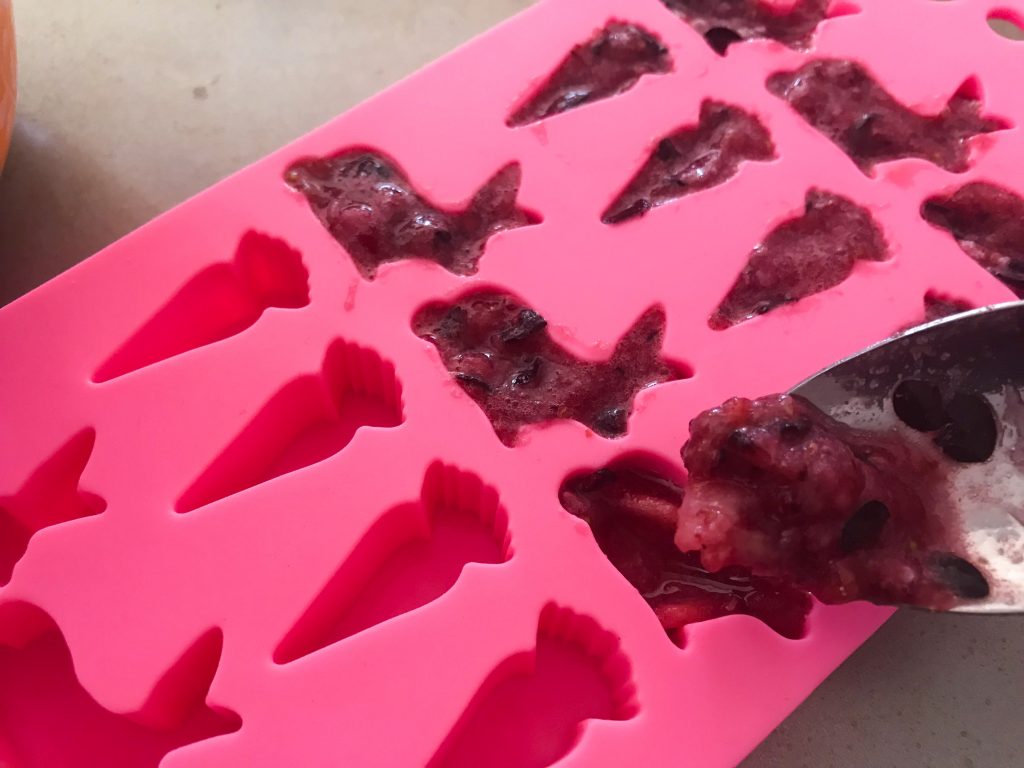
- Take your strawberry paste and spoon it into the mould cavity until it is half full.
- Repeat for all of the cavities.
- Place in the freezer for 30-60 minutes, until the mixture is slightly firm.
- Take your blueberry paste and spoon it into the cavities until it is completely full.
- Repeat with all of the cavities.
- Once finished, place the mould on the tray in the freezer for 3 hours or over night until treats are frozen all the way through.
- Then take the mold and pop out the treats.
- Store in a jar or container in the freezer.

These DIY Easter Treats are fairly simple and are easy. I had frozen strawberries and frozen blueberries on hand so that was convenient. You can also use fresh, but I find that more expensive and it may take longer to freeze into a solid mould. Therefore, I recommend using frozen fruit.

I already mentioned the many benefits of blueberries above for the Frozen Blueberry Coconut Oil Dog Treats. However, strawberries are also very beneficial for your four-legged friend. Similar to blueberries they also contain antioxidants. They are also full of fiber and contain vitamin C. Strawberries also have an enzyme that helps to whiten dog?s teeth, which is always great if your dog isn?t a fan of bones or teeth brushing.
All there of these DIY Easter Treats are super easy to make and use so little ingredients that most people will have them on hand. Also, if you don?t want to include the coconut oil in the Peanut Butter and Raspberry Jam Dog Treats or the Frozen Strawberry-Blueberry Layered Dog Treats you don?t have to. But I recommend storing them in the freezer and giving them to your dog in their bowl or on a place mat. Otherwise they melt very quickly and can make a mess. The blueberries will stain so be careful where your doggie is enjoying their treats.


Mini Mason Jars and Easter Tags
Since these were gifts, I packaged them in the mini mason jars and cut out a name tag for the dog that was receiving it. To cut out the name tag I just used a bunny shaped cookie cutter, as well as an egg shaped cookie cutter. but you can free hand it. I then punched a hole in the tag and used some string to attach it to the mason jar. It was super easy and the mini mason jar is great for storing in the freezer.

The best thing about these treats is that you can make them for any occasion. You can use generic dog moulds, or a mould for a different holiday and use the same recipes. You also don?t need an occasion to treat your dog. These are a great treat for the summer when it?s hot and your furry friend needs a little cooling down.

Let us know if you out try these DIY Easter Treats or if you have other recipes your doggie companion loves in the comments below! Stay posted for our upcoming Doggie Easter Egg Hunt!
Wet Kisses and Tail Wags,
Karlee and Marlee